

Windows
A question that comes to mind for every beginner: How to set up my environment for data-science?
The following guide will teach you how to set up a minimal development environment for Windows.
Prerequisites
- Windows 11
- A GitHub account
WSL
The first and most important part of setting up your Windows dev environment is installing the Windows Subsystem for Linux (WSL). We recommend sticking with Ubuntu but feel free to try out as many distributions as you like.
There used to be a handful of steps needed to install it, but we now only need to enter the following command into PowerShell or Command Prompt:
wsl --installUpdating Linux
It is recommended that you regularly update and upgrade your packages. In Ubuntu or Debian, we use the apt package manager:
sudo apt update && sudo apt upgradeWindows does not automatically update or upgrade your Linux distribution(s). This is a task that most Linux users prefer to control themselves.
Mapping Your Linux Drive
When you open the Windows file explorer, it displays your devices and drives. We are going to add our Ubuntu virtual drive as a network location for easy access.
-
Open the
\\wsl$\location from file explorer:
-
Right-click on the Ubuntu folder, and select
Map network drive:
-
Select the drive letter you would like to use, leave
Reconnect at sign-inchecked andConnect using different credentialsunchecked, and then click finish (mine will look slightly different because it’s already been done):
-
The result should look something like this:

If you wanted to access your Windows files from the Linux terminal, they are found in the /mnt/ directory, so your Windows user directory would be located at /mnt/c/Users/username.
With your Ubuntu drive mapped, you can easily drag/drop or copy/paste Windows files to the Linux file system by using the file explorer.
Pin Your Code Directory
Another quick tip I have is to create a code directory inside of Ubuntu, and then pin it to the quick access menu found on the left side of the file explorer. This comes in handy when transferring files quickly between Windows and Linux.
-
Open File Explorer and click on the Ubuntu network drive we created
-
Select the home dir, and then your user directory
-
Right-click and create a new folder, name it code, or anything else you’d like
-
Drag that new folder to the left, underneath the star icon that says
Quick access.
Restarting WSL
If for some reason WSL stops working, you can restart it with these two commands from PowerShell/Command Prompt:
wsl.exe --shutdownwsl.exeWindows Terminal
A few quick things we recommend setting up are the default profile and your starting home directory. These settings make it so launching Windows Terminal will open directly into WSL inside our user’s home directory.
Default Profile
Windows Terminal will open a PowerShell or Command Prompt shell when launched by default, here is how to switch it to WSL:
-
Select the
˅icon from Windows Terminal and go to the Settings menu:
-
In the Startup section you will find the Default profile dropdown, select Ubuntu. Below it, select Windows Terminal as the Default terminal application:

Starting Directory
A default Ubuntu terminal will open to the root directory. To make finding your files a little quicker we can have it open into your home directory instead.
-
Under the Profiles section in the settings menu click on Ubuntu
-
At the General tab, you will find a Starting directory input
-
Enter the following replacing “username” with your Ubuntu user name:
\\wsl$\Ubuntu\home\username -
You can leave the
Use parent process directorybox unchecked -
If it is still opening into your
/directory, change theCommand linesetting located right above theStarting directoryinput box to the following:wsl.exe -d Ubuntu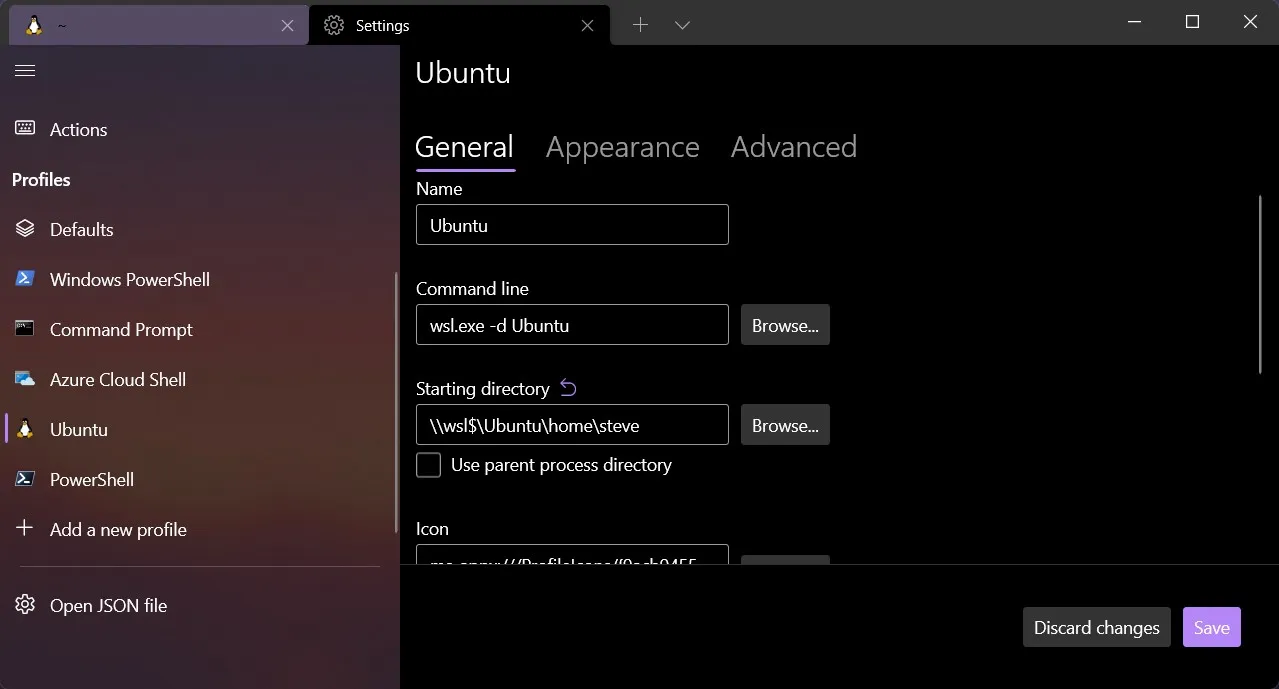
Zsh
Z shell works almost identically to the standard BASH shell found on default Linux installs. What makes it different is its support for plugins and themes, along with some extra features like spelling correction and recursive path expansion. It’s time to throw BASH in the trash!
Installing Zsh
Zsh can be installed with one command:
sudo apt install zshAfter installing, type the zsh command. Zsh will ask you to choose some configurations. We will do this later on while installing oh-my-zsh, so choose option 0 to create the config file and prevent this message from showing again.
OhMyZsh
The most popular plugin framework by far is OhMyZsh. It comes preloaded with loads of plugins, themes, helpers, and more. It can help with productivity for sure, but more importantly, it just looks cool 😎.
cURL
First off, we need to make sure we have cURL installed. Short for “Client URL”, it’s a way to transfer data from the command line, and that’s how we will download OhMyZsh.
sudo apt install curlInstalling OhMyZsh
Enter the following command into your terminal to install OhMyZsh:
sh -c "$(curl -fsSL https://raw.github.com/ohmyzsh/ohmyzsh/master/tools/install.sh)"That’s it! You should now see a .oh-my-zsh directory inside of your home directory. To change your plugins and themes you will need to edit your .zshrc file, also found in your home dir.
Here is a list of all the themes and plugins that come bundled with OhMyZsh.
Plugins
There are countless plugins available, but these two are recommend most.
zsh-autosuggestions
Autosuggestions for zsh, It suggests commands as you type based on history and completions.
-
Clone this repository into
$ZSH_CUSTOM/plugins(by default~/.oh-my-zsh/custom/plugins)Terminal window git clone https://github.com/zsh-users/zsh-autosuggestions ${ZSH_CUSTOM:-~/.oh-my-zsh/custom}/plugins/zsh-autosuggestions -
Add the plugin to the list of plugins for Oh My Zsh to load (inside
~/.zshrc):Terminal window plugins=(git zsh-autosuggestions) -
Start a new terminal session.
zsh-syntax-highlighting
This package provides syntax highlighting for the shell zsh. It enables the highlighting of commands whilst they are typed at a zsh prompt into an interactive terminal. This helps in reviewing commands before running them, particularly in catching syntax errors.
-
Clone this repository in oh-my-zsh’s plugins directory:
Terminal window git clone https://github.com/zsh-users/zsh-syntax-highlighting.git ${ZSH_CUSTOM:-~/.oh-my-zsh/custom}/plugins/zsh-syntax-highlighting -
Activate the plugin in
~/.zshrc:Terminal window plugins=(git zsh-autosuggestions zsh-syntax-highlighting) -
Start a new terminal session.
A huge list of plugins can be found at the awesome zsh plugins repo.
Git Config
Git should come pre-installed on most, if not all of the WSL Linux distributions. To ensure you have the latest version, use the following command in an Ubuntu or Debian-based distro:
sudo apt install gitName
To set up your Git config file, open a WSL command line and set your name with this command (replacing “Your Name” with your preferred username):
git config --global user.name "Your Name"Set your email with this command (replacing “[email protected]” with the email you prefer):
Username
And finally, add your GitHub username to link it to git (case sensitive!):
git config --global user.username "GitHub username"Make sure you are inputting user.username and not user.name otherwise, you will overwrite your name and you will not be correctly synced to your GitHub account.
You can double-check any of your settings by typing git config --global user.name and so on. To make any changes just type the necessary command again as in the examples above.
Python
This section covers setting up python environment for Windows. Python is one of the most powerful programming languages, mostly used in data science, machine learning, and big data analytics.
Python Installation
-
Download an installer from the Python website. To do that, visit https://www.python.org/downloads/, it detects your operating system automatically and shows a big button for downloading the latest version of Python installer. If it doesn’t, click the Windows link and choose the latest Python release.
-
Once the download is complete, double-click the installer to start installing Python. The installer will walk you through a wizard to complete the installation, and in most cases, the default settings work well, so install it like the other applications on windows.
-
This will install the latest version of Python 3. You can verify the installation with:
Terminal window python --version -
If the installer does not include the Add Python to PATH checkbox or you have not selected that option, add Python to PATH manually.
Setting Up Your Python Environment
Once you’ve installed Python you might want to explore some additional tools that will make your Python development experience better. These tools help you manage different Python versions and keep your projects’ dependencies isolated.
Managing Multiple Python Versions with uv
If you work on different Python projects, you might find yourself needing different Python versions. This is where uv comes in handy. It’s a tool that allows you to install and switch between multiple Python versions effortlessly.
-
To install uv use irm to download the script and execute it with iex:
Terminal window powershell -ExecutionPolicy ByPass -c "irm https://astral.sh/uv/install.ps1 | iex" -
To enable shell autocompletion for uv, run this:
Terminal window if (!(Test-Path -Path $PROFILE)) {New-Item -ItemType File -Path $PROFILE -Force}Add-Content -Path $PROFILE -Value '(& uv generate-shell-completion powershell) | Out-String | Invoke-Expression' -
To enable shell autocompletion for uvx, run this:
Terminal window if (!(Test-Path -Path $PROFILE)) {New-Item -ItemType File -Path $PROFILE -Force}Add-Content -Path $PROFILE -Value '(& uvx --generate-shell-completion powershell) | Out-String | Invoke-Expression'Then restart the shell or source the shell config file.
-
Install the Python version you need:
Terminal window uv python install 3.10.x
Working with Virtual Environments
Virtual environments are an essential tool for modern Python development. They create isolated spaces where you can install packages without affecting your system-wide Python installation. This prevents dependency conflicts between different projects.
-
Create a new environment using uv:
Terminal window uv venv -
Install a package in the new virtual environment
Terminal window uv pip install ruff -
The virtual environment can be “activated” to make its packages available:
Terminal window source .venv/bin/activate -
When you’re done, deactivate the environment:
Terminal window deactivate
Docker
This section covers setting docker desktop for MacOS. In the end, you will have a docker-daemon, docker-cli, docker-compose, and more.
Docker provides the ability to package and run an application in a loosely isolated environment called a container. For more info Checkout Docs.
Docker Installation
-
Download the executable for docker-desktop.
-
Install the executable, and choose the appropriate virtualization environment while installing if the option shows up.
-
Done with installation. Sign in with the docker account or skip for the time being.
Test Docker CLI
Make sure you at least launch docker-desktop once, and let it run in the background.
docker -vYou have successfully installed docker-desktop and all other necessary tools docker-cli, docker-compose, and more.
Package Managers
JavaScript package managers play a pivotal role in web development. They are tools that automate installing, upgrading, configuring, and consistently removing computer programs. They are critical in managing the numerous packages developers use to build complex applications.
Three prominent package managers have gained popularity in the JavaScript community: NPM, Yarn, PNPM and Bun.
NPM
-
As the name suggests, NPM (Node Package Manager) is a package manager for the JavaScript runtime environment Node.js.
-
It comes bundled with Node.js, so when you install Node.js, you automatically get NPM installed on your computer.
YARN
-
Yarn is a new package manager developed by Facebook in response to some of the problems they faced with NPM, particularly regarding speed, security, and reliability.
-
Yarn introduced some new features unavailable in NPM, such as offline package installation and deterministic dependency resolution.
-
Installation
-
Since v16.13, Node.js is shipping Corepack for managing package managers.
-
This is an experimental feature, so you need to enable it by running:
Terminal window corepack enable -
You can quickly check whether Corepack is enabled by running
yarn exec env: if you get a path as output, Corepack is properly installed.
-
PNPM
-
PNPM, standing for Performant NPM, is a JavaScript package manager that aims to solve some of the issues associated with NPM and Yarn.
-
It can be a drop-in replacement for these tools while providing better performance and disk space usage.
-
PNPM uses a unique approach to manage node modules, which makes it highly disk efficient.
-
Installation
-
Since v16.13, Node.js is shipping Corepack for managing package managers.
-
This is an experimental feature, so you need to enable it by running:
Terminal window corepack enable pnpm
-
Bun
-
Bun is an all-in-one JavaScript runtime & toolkit designed for speed, complete with a bundler, test runner, and Node.js-compatible package manager.
-
It aims to provide a high-performance alternative to Node.js with better speed and resource efficiency.
-
Bun’s package manager is significantly faster than npm, yarn, and pnpm while maintaining compatibility with the npm registry.
-
Installation
Terminal window powershell -c "irm bun.sh/install.ps1|iex"Terminal window npm install -g bunTerminal window scoop install bun
Basic commands
-
Initialize a new project
To create a new project, navigate to your project directory and run the following commands.
This will create a
package.jsonfile with the default settings. -
Install a package
To install the required package, you can run the following commands.
This will install and add the package to your package.json file under the dependencies section.
-
Install a development package
To install a package for development purposes, run the following commands.
This will install and add the package to your package.json file under the devDependencies section.
-
Run a script
To run a script defined in your package.json file, run the following commands
This will run the script defined in the scripts section of your package.json file.
Integrated Development Environment
-
Essentially, there are two different philosophies that define your setup as a web developer.
-
While there are developers who prefer to have all their tooling in one Integrated Development Environment (IDE), there are developers who prefer to use multiple lightweight tools (e.g. editor/IDE, standalone terminal) and combine them for their purposes.
-
For beginners to web development, we recommend using one tool. The IDE (e.g. VS Code) combines everything that is needed for coding (editor) and executing the code (integrated terminal).
Installing VS Code
VS Code is available on Windows, macOS, and Linux. You can download the latest Windows installer here. We recommend using the stable build.
Changing the Default Shell
The WSL2 shell can be chosen as the default VS Code terminal by pressing Ctrl + Shift + P and typing/choosing Terminal: Select Default Profile, then selecting zsh:


Remote Extension
-
Install the Remote - WSL extension on VS Code.
-
This allows you to use WSL as your integrated development environment and will handle compatibility and pathing for you. Learn more.
-
This extension will also allow you to launch VS Code right from your WSL terminal by using the
codecommand. -
If I were inside the root directory of my repository, I would use
code .to launch the entire directory inside VS Code.Terminal window cd my-projectcode .
Useful Extensions
-
Python - Includes many useful features, such as code completion with IntelliSense, debugging, unit testing support, etc.
-
Docker - Makes it easy to create, manage, and debug containerized applications.
-
Error Lens - Improve highlighting of errors, warnings and other language diagnostics.
-
indent-rainbow - Makes indentation easier to read.
-
MDX - Language support for MDX
-
vscode-icons - Icons for Visual Studio Code
-
Fluent Icons - Fluent product icons for Visual Studio Code
-
Material Theme Icons - Material Theme Icons, the most epic icons theme for Visual Studio Code and Material Theme.
References
Start your journey with ChaiCode
All of our courses are available on chaicode.com. Feel free to check them out.